These Cogsworth Cupcakes from Beauty and the Beast are the absolute best. And perfect timing because I just screened Beauty and the Beast and interviewed the cast. I cannot tell you how incredibly amazing this weekend has been.

It’s still not over. I am knee deep in action while out in LA!! I thought it would be fun to post a cute cupcake design that you can make for the kids if you are gearing up to watch Beauty and the Beast as soon as it hits theatres on March 17!
If you want to make these Cogsworth Cupcakes from Beauty and the Beast, you only need a few items. Let’s get started!
Beauty And The Beast Cupcakes

Beauty And The Beast Cupcakes Ingredients
- Banana Marshmallow Pies
- Tootsie Rolls
- Yellow Jelly Beans
- Wilton Drizzle Pouch, Bright White and Lite Cocoa
- Edible Decorating Pens

Beauty And The Beast Cupcakes Directions
Lay 6 tootsie rolls in a row and microwave for about 12 seconds and press together and flatten out on a parchment-lined baking sheet.
Cut two strips to fit around the marshmallow pie. Lightly press them on. Heat 2 more tootsie rolls for about 3-5 seconds and mold each into a little wave-like shape. (This will become the “mantle”)
Take the 2 pieces of the mantle and place them on the top of the pie. Add a drop of water to the tootsie roll so it’ll stick.
4. Then, take 3 yellow jelly beans and place one in-between the middle of the mantle pieces and the other 2 inside each mantle. Using white drizzle pouch, attach a yellow jelly bean to the center of pie.

Cut a few thin slivers from the rolled out tootsie rolls and shape into clock hands and press onto pie. Make 2 little white eyes with the white drizzle and a smiley mouth with the brown drizzle. (Could also draw an open mouth and color in a tongue with a red edible marker).
With the edible marker, color little black dots on the white eyes for his eyeballs. (Can use a blue edible marker as well). Super cute and easy to make!
How adorable, right? What do you think about these Beauty and the Beast Cupcakes? Something you’d like to make for the kids? YUMMMMMMM

Related Posts:
- The Le Creuset Beauty And The Beast Soup Pot From Williams Sonoma
- How I Fell In Love With Luke Evans And Josh Gad During Our Beauty And The Beast Interview #BeOurGuestEvent
- Beauty And The Beast Movie Review
- Gingerbread Man Pops: Holiday Recipe For The Kids
Beauty And The Beast Cupcakes Recipe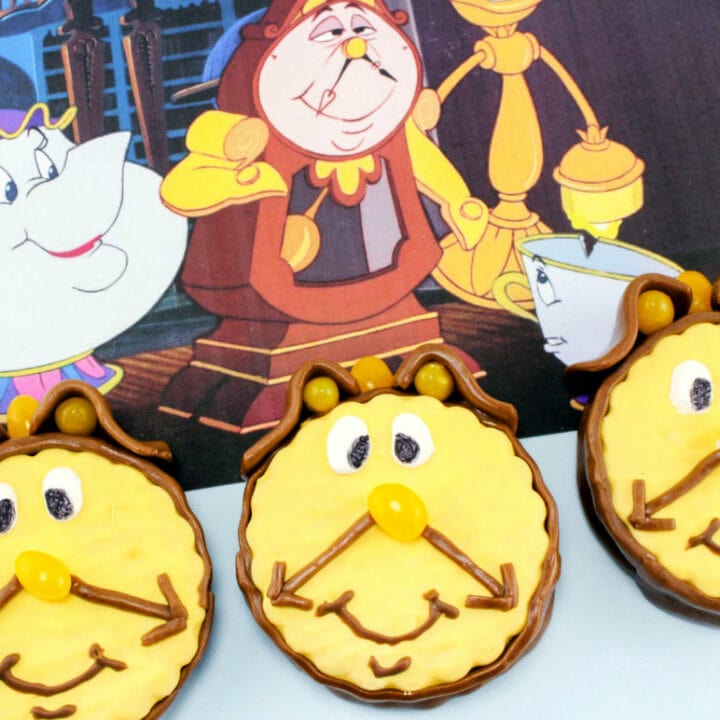
Beauty And The Beast Cupcakes Recipe
Ingredients
Instructions