This easy DIY chocolate dipped strawberries recipe is a great fruit treat to bring out during the spring and summer. Brighten up your dessert table with this easy-to-make finger food that will wow the crowd and make your guests smile.

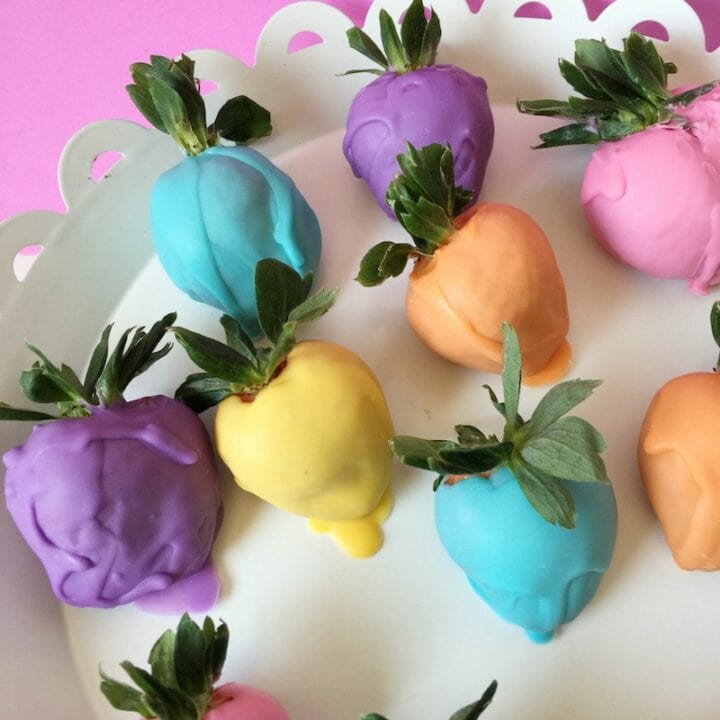
I mean that quite literally of course! Instead of showcasing chocolate brown, why not opt for some bright pinks and oranges and yellows? Super fun for spring holidays like Easter and Mother’s Day.
Now is the perfect time to play around with the bright and the bold. Your kids will love these designs … and your neighbors will too.

Easy DIY Chocolate Dipped Strawberries Recipe
This section contains affiliate links.
This Chocolate Dipped Strawberries Recipe is easy enough to make. You just need to swap out your base. Of course, the juiciest and freshest berries are an absolute MUST. But shopping for pastel bases is ab absolute must.
You should search for several variations of melting chips online to replicate this look. I got all of these styles on Amazon. Prime is magical. You can make these in less than 48 hours if you order right now.

Chocolate Dipped Strawberries Recipe Ingredients:
- 12 strawberries
- 12 Wilton chocolate melting chips each in pink, purple, orange, blue, yellow and white
- NOTE : 12 chips will cover 2 strawberries

Chocolate Dipped Strawberries Directions:
Line a cookie/baking sheet with wax paper and set aside. Rinse strawberries and dry completely. Place in refrigerator to chill. Place the various colors of melting chips in small microwaveable bowls. Microwave each bowl one at a time, for 30 seconds.
How do you get chocolate to stick to strawberries?
Using a spoon, drizzle the melted chocolate onto 2 strawberries, covering completely except for the stem. Lay on a baking sheet to harden. It will not take long to “set” because the strawberries were chilled. Repeat steps for all the colors you’d like to add.
Store in an airtight container in the refrigerator up to 3 days until ready to serve. It would be better if you ate them closer to when you actually made them though – full disclosure! ENJOY!!
What is the best chocolate to melt?
- Nestle Toll House Semi-Sweet Chocolate Morsels.
- Oasis Supply Mercken’s Chocolate Wafers Candy Making Supplies.
- Wilton Microwaveable Real Milk Chocolate Melting Chocolates.
- Merckens Milk Chocolate Melts.
How far in advance can you make chocolate covered strawberries?
This recipe can be kept in the refrigerator for several days when stored properly. I wouldn’t go more than 2 or 3 days. Try to eat them within 48 hours.
Cover them in wax paper and store them in an airtight container so that the strawberries won’t go bad.
Are chocolate chips good for melting?
It is not the preferred method. You should absolutely consider the melting wafers instead. BUT if you have to make this recipe and only have chocolate chips on hand… run with it.
How do you thin chocolate for dipping?
If, for some reason, you feel that your dipping chocolate is too thick and you want to thin it out – there are ways! You can add oil or butter to your mix and it will thin out your mixture.
What do you think about this Easy DIY Chocolate Dipped Strawberries Recipe? Are you going to give it a try?
Related Posts:
- Pineapple Upside Down Monkey Bread Recipe
- Strawberry Shortcake Trifle Recipe
- Mint Chocolate Chip Cookies Recipe
Chocolate Dipped Strawberries Recipe
Ingredients
- 12 strawberries
- 12 Wilton chocolate melting chips each in pink, purple, orange, blue, yellow and white
- NOTE : 12 chips will cover 2 strawberries
Instructions
- Line a cookie/baking sheet with wax paper and set aside.
- Rinse strawberries and dry completely.
- Place in refrigerator to chill.
- Place the various colors of melting chips in small microwaveable bowls. Microwave each bowl one at a time, for 30 seconds.
- Using a spoon, drizzle the melted chocolate onto 2 strawberries, covering completely except for the stem.
- Lay on a baking sheet to harden. It will not take long to "set" because the strawberries were chilled.
- Repeat steps for all the colors you'd like to add.
- Store in an airtight container in the refrigerator up to 3 days until ready to serve.